Unlock the secrets to creating stunning visual outlines in Roblox Studio and elevate your game's aesthetics. This comprehensive guide delves into various methods for implementing the "roblox studio outline effect", from simple built-in tools to advanced scripting techniques. Discover how to highlight interactive objects, enhance UI elements, and give your creations a professional, polished look that captures player attention. We'll explore optimization tips to ensure your game runs smoothly across all devices, including mobile, which accounts for a significant portion of Roblox's user base. Learn from common pitfalls and gain insights into how top developers leverage outlines to improve player experience and immersion. Whether you're a new developer looking for a quick visual upgrade or an experienced creator aiming for intricate custom effects, this guide provides actionable steps and expert advice to master outline effects in Roblox Studio. Stay current with trending visual styles and make your game stand out.
What is the simplest method to add an outline to a part in Roblox Studio?
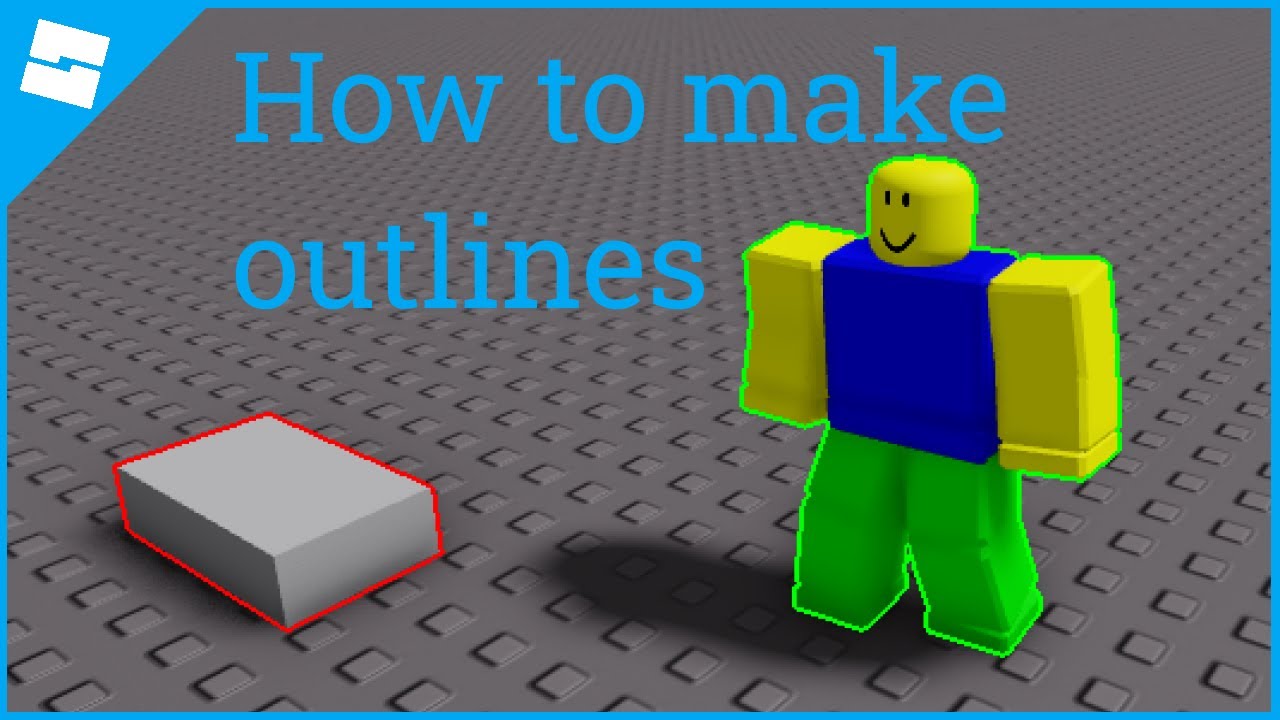
The simplest method involves using the built-in Highlight object. You can insert a Highlight object into any part or model, and it will automatically generate an outline around its descendants. This is ideal for quick visual cues and requires no scripting, making it perfect for new creators.
How can I change the color and thickness of a Roblox Studio outline effect?
If you're using the Highlight object, you can adjust its `OutlineColor` property to any desired color, and the `FillColor` property for the inner glow. For thickness, the `Highlight` object has limited direct control, but custom scripting or `BillboardGui` methods allow for precise pixel-level thickness adjustments.
Do outline effects in Roblox Studio affect game performance, especially on mobile?
Yes, all visual effects have a performance cost. The built-in `Highlight` object is generally optimized, but excessive use, especially on complex models, can impact frame rates. Custom scripted outlines or post-processing effects can be more resource-intensive, requiring careful optimization, particularly for for the large segment of mobile Roblox players.
Is it possible to create animated or dynamic outline effects in Roblox Studio?
Absolutely. While the `Highlight` object is static, advanced creators often use scripting with `TweenService` to animate outline colors, transparency, or even visibility. Techniques involving `SurfaceGuis` or `BillboardGuis` can be leveraged to create pulsing, glowing, or dynamic selection outlines based on player interaction or game events.
What are some creative uses for the Roblox Studio outline effect in game design?
Outline effects are incredibly versatile. They are commonly used to highlight interactive objects, indicate quest objectives, visually group elements in UIs, show player selection, or even create a distinctive cel-shaded art style. They can guide players, improve UI clarity, and add significant visual polish to your game world.
Can I use outline effects on transparent objects or parts in Roblox Studio?
Using the `Highlight` object on transparent parts can sometimes yield inconsistent or undesirable results, often showing the outline through the transparent object itself. For transparent objects or specific visual needs, developers typically opt for custom scripting solutions, like drawing outlines with `BillboardGuis` or manipulating post-processing effects, to achieve cleaner results.
Where can I find community resources or example scripts for advanced Roblox Studio outline effects?
The Roblox Developer Forum is an excellent resource, often featuring threads with open-source scripts and detailed tutorials from experienced developers. YouTube channels dedicated to Roblox Studio tutorials, community Discord servers, and sites like GitHub also host various example scripts and free models that demonstrate sophisticated outline techniques beyond the basic `Highlight` object.
Welcome, fellow developers and creators! In the bustling world of Roblox, where millions of games are vying for attention, visual polish can make all the difference. As gamers balancing jobs, families, and life, we know how precious our time is, whether we're playing or creating. We crave experiences that are fun, engaging, and just work, without unnecessary setup headaches or performance hiccups. One simple yet incredibly powerful way to elevate your game's visual appeal and player guidance is through the "roblox studio outline effect." This isn't just about making things look pretty; it's about clear communication, intuitive design, and adding that professional touch that keeps players coming back. If you've ever wondered how to make interactable objects pop, guide players through complex environments, or simply achieve a distinct art style like cel-shading, you're in the right place. This guide will walk you through everything you need to know about implementing and optimizing outline effects in Roblox Studio, ensuring your creations are both beautiful and performant.
US gamers, comprising roughly 60% of the gaming population with an average age around 36, appreciate games that offer relaxation, skill-building, and social interaction without demanding endless hours for basic setup. By mastering the "roblox studio outline effect," you're not just adding a visual flair; you're enhancing gameplay clarity, a critical aspect for players who value their limited gaming time. With mobile gaming dominating and social experiences thriving on platforms like Discord, a visually intuitive game built with care and optimized for performance is key to success. Let's dive into how you can use outline effects to solve common design challenges and make your game truly shine.
What is a Roblox Studio Outline Effect and Why Use It?
A Roblox Studio outline effect is a visual border or glow that appears around objects, parts, or models in your game world. It's a fundamental design tool that can drastically improve visual communication and aesthetic appeal. Think of it as a subtle highlight that directs player attention without cluttering the screen. There are various ways to achieve this effect, from simple built-in objects to complex scripting. For example, using the `Highlight` object is a common and straightforward method, while more advanced creators might script custom shaders for unique looks.
The primary reasons to use outlines are multifold. Firstly, they provide visual hierarchy, making important objects stand out from the background. This is crucial for interactive elements, quest items, or collectible objects. Secondly, outlines can enhance a game's art style, contributing to popular looks like cel-shading or a futuristic UI. Thirdly, they aid in player guidance, subtly hinting at interactable areas or safe zones. For busy gamers who might only have an hour or two to play, clear visual cues mean less frustration and more fun, fostering that sense of relaxation and accomplishment. With 87% of US gamers playing regularly, and many averaging over 10 hours a week, ensuring a smooth and intuitive experience is paramount.
How Can I Implement a Basic Outline Effect in Roblox Studio?
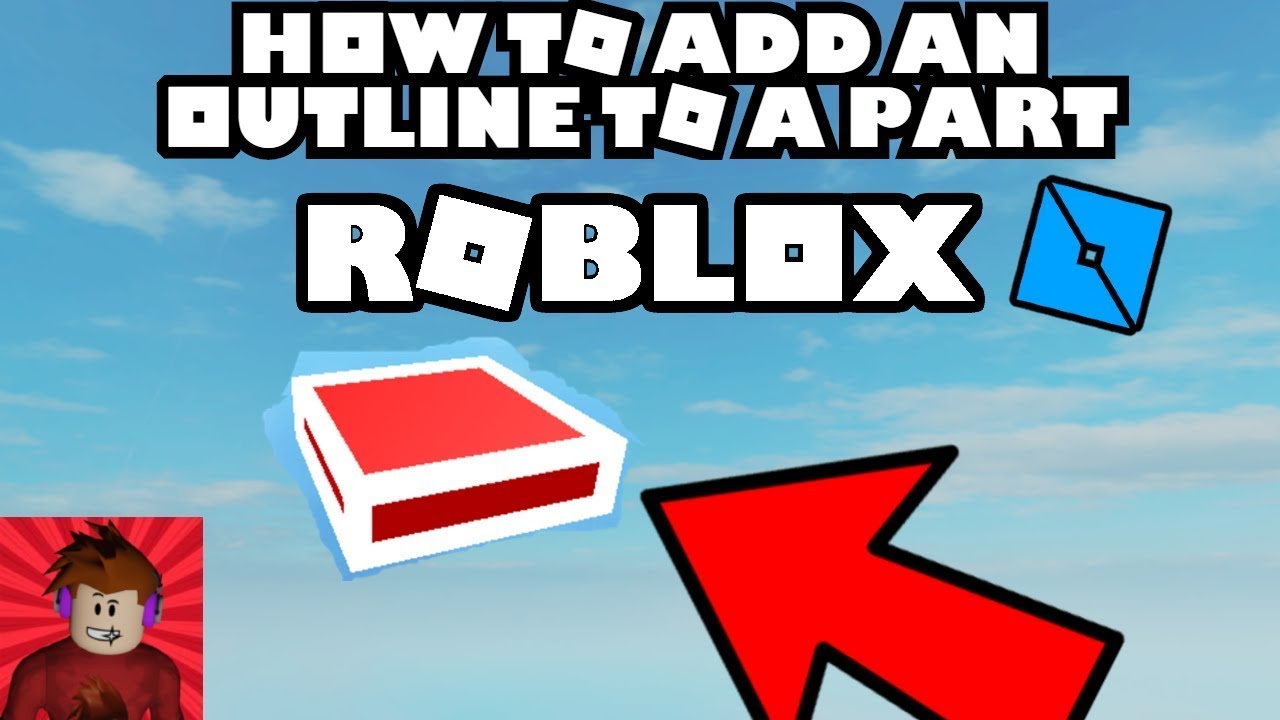
The easiest way to implement a basic "roblox studio outline effect" is by using the `Highlight` object. This built-in feature is remarkably simple and doesn't require any scripting, making it perfect for beginners or quick visual enhancements. Here's how you do it:
Select the Part or Model: In your Roblox Studio Explorer window, select the part, model, or folder containing the objects you want to outline. The `Highlight` object will apply to all descendants of its parent.
Insert a Highlight Object: Right-click on the selected part or model, hover over 'Insert Object', and search for 'Highlight'. Click to insert it.
Configure Properties: Once inserted, select the `Highlight` object in the Explorer. In the Properties window, you'll see several key properties:
OutlineColor: This is the color of the outline itself. Choose a color that contrasts well with your object and environment.FillColor: This controls the color of the fill inside the outline. Often, you'll want this to match the object's original color or be slightly lighter/darker.FillTransparency: Adjust this property (from 0 for opaque to 1 for fully transparent) to control how much the inner fill shows through. For a pure outline effect, you might set this to 1.DepthMode: This determines if the outline appears through other objects. Set to `AlwaysOnTop` for outlines that are always visible, or `Occluded` to only show outlines when the object is directly visible.
Experiment with these properties to achieve the desired visual result. This method is incredibly efficient for simple highlights and works well for interactive elements like buttons, doors, or pickups.
What are the Limitations of the Highlight Object for Outlines?
While the `Highlight` object is fantastic for ease of use, it does come with certain limitations that more experienced creators might find restrictive. Understanding these can help you decide when to opt for more advanced techniques. One key limitation is the lack of granular control over outline thickness. You can't directly adjust the pixel width of the outline; its thickness is generally determined by rendering engine defaults. This can be problematic if you're aiming for a very specific stylistic look, such as a thin, crisp border for a UI element or a thick, chunky line for a cartoonish aesthetic.
Another challenge arises with transparency. When applied to partially transparent objects, the `Highlight` object's outline might not render as cleanly or effectively as desired, sometimes creating a less-than-ideal visual blend. Performance can also become a concern with excessive use on extremely complex models or a large number of highlighted objects, especially for the significant portion of players on mobile devices. While generally optimized, heavy reliance can lead to increased draw calls and potentially impact frame rates. Lastly, advanced animation or dynamic effects (like pulsing outlines) are not directly supported by the `Highlight` object's properties alone, requiring scripting workarounds even for basic movement.
How Do Developers Create Custom Outline Effects with Scripts?
For creators who hit the limitations of the `Highlight` object, scripting opens up a world of possibilities for custom "roblox studio outline effect" designs. These methods offer greater control over appearance, animation, and interaction. Here are a few popular techniques:
Using `BillboardGuis` or `SurfaceGuis`: This is a common method for creating highly customizable outlines. You can parent a `BillboardGui` (for screen-facing effects) or `SurfaceGui` (for effects projected onto a part's surface) to a part. Inside the GUI, place an `ImageLabel` or `Frame` that displays a pre-rendered outline texture or simply a colored border. By scripting its `ZOffset` or `AlwaysOnTop` property, you can ensure it appears correctly. This allows for animated textures, custom line styles, and precise thickness control.
Duplicating and Scaling: A more traditional, albeit less efficient, method involves duplicating the object, scaling it slightly larger, setting its material to `ForceField` or `Neon`, and then changing its `Transparency` to create an outer glow. The original object is then parented inside the scaled duplicate. While visually effective, this method creates extra geometry and may not be ideal for performance-sensitive games or complex models.
Post-Processing Effects (Advanced): For truly unique and dynamic outlines, some developers delve into custom post-processing shaders. This involves creating a `ScreenGui` with a `ViewportFrame` that renders the game world, applying `ImageEffects` or custom `Shaders` (if available via future updates or engine capabilities) to draw outlines. This method offers the highest level of control and can achieve effects like cel-shading, real-time edge detection, or complex glow patterns. However, it requires significant scripting knowledge and can be resource-intensive, requiring careful optimization for diverse hardware, especially for players upgrading hardware on a budget.
Scripting allows for outlines to react to player proximity, selection, or specific game events, adding a layer of dynamic visual feedback that enhances the player's sense of control and immersion. This month's trends in Roblox often show creators pushing visual boundaries through such custom techniques.
Can I Achieve a Cel-Shaded Outline Look in Roblox Studio?
Absolutely! The "roblox studio outline effect" is a cornerstone of achieving a cel-shaded or toon-shaded aesthetic, a popular art style in many games. Cel-shading gives objects a distinctive, flat, cartoonish appearance with hard shadows and prominent outlines, mimicking hand-drawn animation. While Roblox Studio doesn't have a direct
Easy visual enhancement, object highlighting, UI clarity, scriptable effects, post-processing options, improving game aesthetics, creator tools, performance optimization, mobile compatibility, professional game polish.
35


Cartoony Outline CellShade Effect ROBLOX STUDIO Tutorial YouTube Hqdefault . How To Make An Outline Effect In Roblox Studio Beginner Tutorial . How To Make An Outline In Roblox Studio YouTube . Outlined Character More Cartoony Objects ROBLOX STUDIO Tutorial YouTube . How To Add A RAINBOW OUTLINE EFFECT On PARTS Roblox Studio Tutorial


How To Add OUTLINES Onto Parts Roblox Studio Tutorial YouTube . How To Add An Outline To Blocks Roblox Studio Tutorial YouTube . Outline Bug On Roblox Studio Building Support Developer Forum Roblox . Roblox Studio Blue Outline Game Design Support Developer Forum 2 1312x1000 . How To Make Outlined Parts In Roblox Studio YouTube


How To Add Particle Effects In Roblox Studio 2025 Step By Step YouTube . Roblox Studio Effects Tutorial YouTube . How To Add OUTLINES Onto Parts Roblox Studio Tutorial YouTube . How To Make Outlines Cel Shaded Effects In Roblox Studio . How To Add OUTLINES To Parts And Models Roblox Studio Tutorial YouTube


Help With Creating A Selection Outline Similar To Roblox Studio . A Quick Guide On How To Add And Configure Realistic Effects In Roblox . How To Make Cel Shading And Outline Effects On Roblox Studio Easy . How To Make Outlines On ANYTHING Roblox YouTube . Roblox With Red Outline Text Effect Generator Roblox.webp


Roblox With Pink Outline And 3D Projection Text Effect Generator Roblox.webp. Sketch Outline Roblox Why Does Every Light Image I Make Have This . Create Roblox Vfx And Particle Effects In Roblox Studio By Ivenarjorik Create Roblox Vfx And Particle Effects In Roblox Studio . Creating Character Outlines In Roblox Studio TikTok Img. Ic Nes Roses Roblox Clipart T L Chargement Gratuit De SVG PNG GIF Roblox New


SOLVED How To Disable Red Outline Around Touching Surfaces Platform . Bold 2026 Year Number With Outline Effect Premium Vector Bold 2026 Year Number With Outline Effect 240580 2620 . 2026 Comic Speech Bubbles Text Effect Generator 2026.webp. Roblox Logo 2026 PNG Transparent Images Free Download Vector Files Pngtree Hello 2026 Gradient Emboss Text Effect Png Image. Best 13 Using Roblox Studio Artofit


How To Give A Character An Outline Effect Scripting Support . 2026 Outline 3D Text Effect Generator 2026.webp. Avatar Has A Random Red Outline When Playtesting In Any Game Platform . Roblox Black And White Outline Text Effect Generator Roblox.webp. Is There Anyway To Outline A Part In Studio Building Support